Magic Lantern is an alternative operating system (firmware) developed by volunteer programmers in an open source environment.
The firmware is not endorsed nor supported
by Canon and users temporarily overwrite the camera software with this alternative at their own risk. Installing this firmware could (although very unlikely) leave your camera in a locked, useless state.
Luckily, the latest versions of the Magic Lantern Firmware allow you to, using a separate SD/CF card in your camera, load and remove this system, re-instating the original Canon firmware if required. Earlier versions of Magic Lantern are considered to be more stable but leave a boot flag on the camera. The 'Nightly Builds' available for download on the Magic Lantern web site will give you the very latest features but as mentioned come with some potential risks. We found problems with certain builds and eventually settled on one that has been very stable - 30th May 15.
Select 1080p HD in video settings for the best picture
Above; Promo Video by Metech Multimedia for our client Millennium Studios. Shot with a Canon 5D Mk III / L series lenses and the Magic Lantern Firmware Installed. Of course YouTube has compressed the video but the advantage of using Magic Lantern is quite clear when compared to the standard DSLR h264 that the camera exports.
Video Note; There is one Phantom 3 quadcopter shot which is the camera onboard and not Magic Lantern video.
The still images at the end are stretched in most cases due to being supplied web size files, however, worth putting in due to their important content!
Metech is actually situated just 100 yards away from the 'A' Stage, should our projects require its use we have reduced hire rates.
What does Magic Lantern do?
Amongst a host of features for both video and photography, that are not available in the Canon firmware the camera ships with (see the Magic Lantern web site) our focus of interest is the fact that shooting video bypasses the camera compression (h264) and allows capture straight from the censor at a wide dynamic range in 14-bit RAW format. You record to fast SD/CF cards, with the data chewing up 8 gig a minute!
Shooting video you also have handy focus peaking, zebras, crops, overlays, false colour, RGB histogram with RAW support, waveform, vectorscope, magic zoom (you can record video at 3x zoom, which on a 200mm lens effectively gives you 600mm (check that out nature shooters!). You can also shoot HDR video!
Clean HDMI Out Video from Canon 5D Mk III
Some may believe you can go clean out of the camera hdmi output to an external device and get an image off the censor at a 10-bit resolution, but sadly Canon restricted this, so the hdmi out is still 8-bit but you do get the advantage of going straight to ProRes or DNG with something like the Atomos recorders such as the Shogun or Ninja 2 Atomos Video Recorder. This avoids the bad to edit and re-crunch h264 the camera records by default. So you get 8-bit footage captured clean in a 10-bit environment in that case (O'h and you don't need Magic Lantern to do this, it's only the additional functionality you would gain from the firmware, not image quality.. Also, hdmi out is not supported at the time of writing within the Nightly Builds in the newer format but is in the stable release of Magic Lantern).
What do I need?
Our Choice
Canon DSLR Camera (of course).
Fast Mac (or PC) There's a lot of heavy processing to do.
Large Hard Drive Consider 15-20 gig a minute if you are keeping all the files along the way. (.MLV video, DNG's into Lightroom, DNG's out of Lightroom, ProRes Exports for use in timeline and renders in your editor, audio + edits.
SD Card For your Magic Lantern Software.
Fast /CF Card, For writing files to, we use Komputerbay 1066x with a write speed of 155MB/s.
Card Reader (Canon Utilities will not see the files or mount the disc)
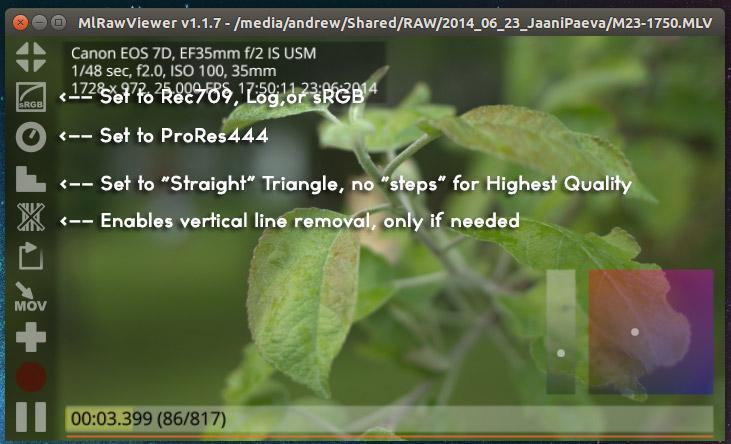
MLRawViewer will give you a preview of your footage straight away, so you can check it's ok in the field following import to a laptop. You can sort of play back on the camera, slow and buffered to check your framing but as the files are so heavy realistic playback is not feasible, so this free software is pretty handy.
MLRawViewer offers various curves and simple white balance/colour correction and outputs DNG files in sequence. This software embeds your lens profile in the files which is handy when you do correction in Lightroom. RAW Magic is £23 from the Apple Store, don't get the light version as it won't read the newer 'Nightly Build' .MLV video format. This is a straight import/converter creating DNG's. It's quick and efficient, with options for bit settings on export.
Lightroom The industry standard for RAW photo manipulation, sure people use Photoshop as well but you'll want to re-export the sequences once you've done your colour correction and enhancement which is pasted throughout your files following the editing of one frame image.
Note; You can of course skip the above colour correction, Lightroom import etc if you wanted to do that in your Video editing software. We found Lightroom to be a good option for some footage and other footage is best left alone and corrected once converted to Apple ProRes.
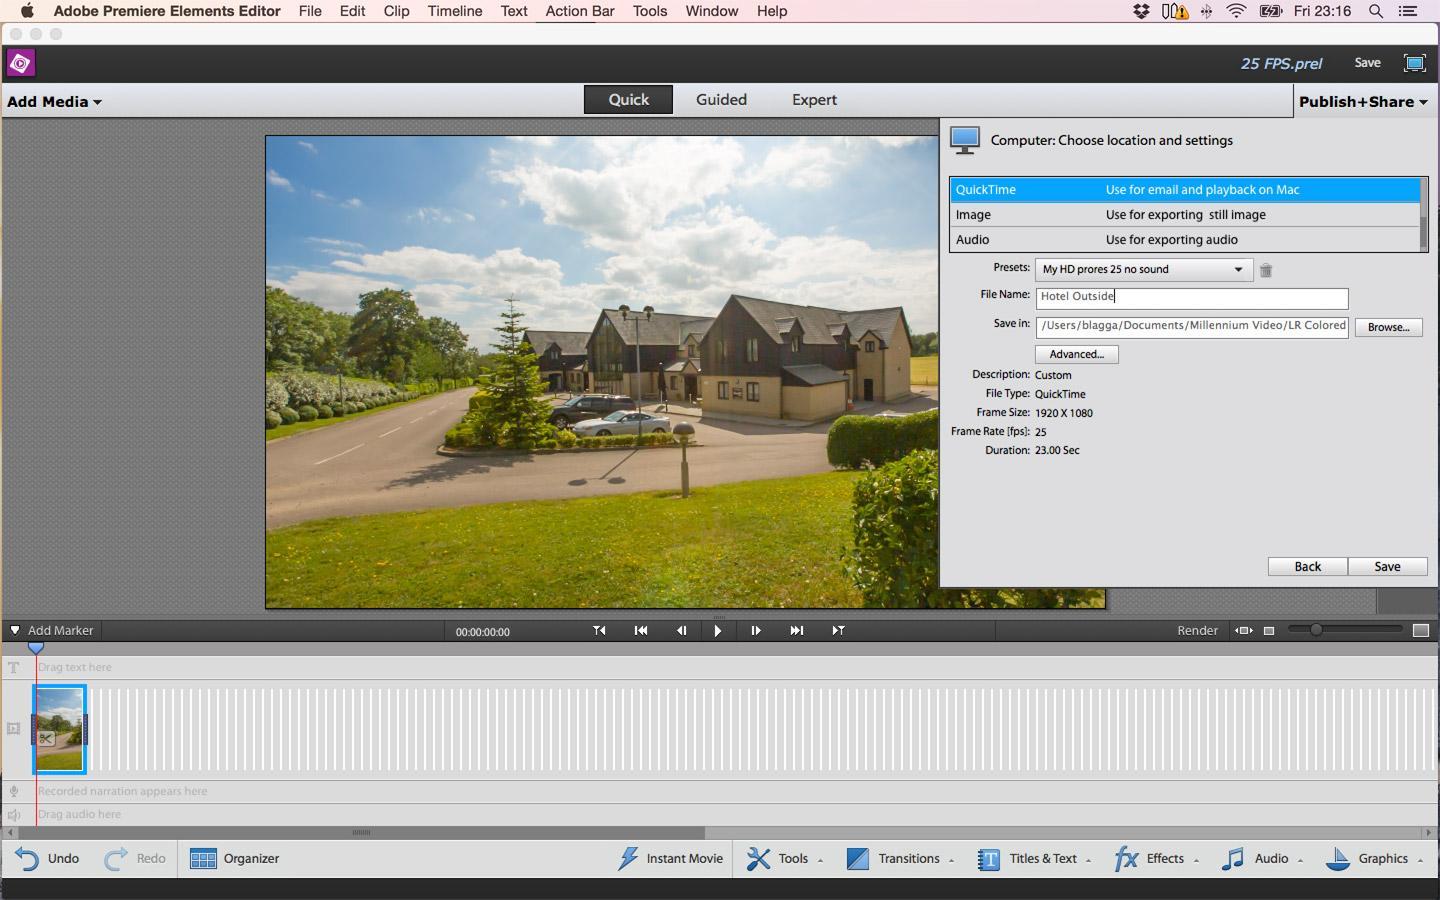
Premiere Elements Simply use this to import the DNG sequences you've colour corrected in Lightroom OR exported from RawMagic or MLRawViewer and export this timeline to Apple ProRes 422HQ or 444. Other software such as After Effects performs this efficiently too.
DaVinci Resolve Lite an excellent free editor but will export your lovely 14-bit files at only 10-bit ProRes.. mmm, no thanks.. HEY, but a vast improvement on the h264 8-bit compression in the camera and still very clean and dynamic, with of course lower file sizes that will play smoother on older machines (if you're not uploading).. Also, industry standard for TV broadcast!
Final Cut Our choice for editing the ProRes files.

RAWMagic for converting .MLV video files
MLRAW Viewer for viewing and converting .MLV video files

Lightroom for Enhancing/colour correcting your DNG's
Premiere Elements for converting DNG's into ProRes Video

Final Cut for compiling and editing video for export
Note; Once you've converted your 14-bit DNG's to Apple ProRes your video file will end up 12-bit (ProRes Max) for your timeline but to that point you've kept everything top notch and second notch i.e 12-bit in this case, is still far more dynamic and rich in colour than 10-bit or 8-bit to an external device and a mile away from the 8-bit h264 the camera records by default.
Audio
Magic Lantern records audio inside the .MLV video in sample rates to suit (industry standard 16-bit 48kHz is a good starting point). You can monitor audio with headphones and adjust levels visually on screen where a display shows db, although if you are keeping location recordings I'd suggest a separate external recorder with a dedicated mic you can sync back with camera recorded audio in your video editing suite. When you import your .MLV files into MLRawViewer or RAW Magic the software extracts the audio into a separate file, which is quite handy as at that point you're about to convert all your video to DNG stills.
Put the audio to one side after the first conversion of the .MLV files.. it will all sync back up in the end on your Video Editor timeline, providing you stick to your frame rate throughout.
Export from your editor; Keep it in the exact ProRes format you are working in, YouTube's happy with that and it's the best you can upload, again keeping things to the max all the time. The video example in this page at three and a half minutes was a hefty four gig on export from Final Cut but after 12 hours or so, uploaded to YouTube and converted real nice.
Workflow Tips
Turn off your camera auto shut down timer feature so as not to interrupt recording. Running the Magic Lantern firmware, the camera thinks it's not in use as far as shooting video goes!
Format the card you are writing to (not the SD you have Magic Lantern on, that should be formatted in the camera before adding the installer/boot flag to it on your computer) to ExFAT in your Mac, that way you will get a longer straight record time, you will be limited to 4GB - (about 30 seconds) if you format your writing card in the camera.
Use settings as per Cinestyle or similar.. Basically, turn down your saturation and contrast in the camera (also lower sharpness a bit if it's a film look you're after). Making these adjustments when you record will give you a wider dynamic range to work with going forward. If you think about a colour being saturated or with heavy contrast, you're basically jamming the pixels into a solid colour, whereas without this you are allowing more gradient of colour or black or white in your image to play with later when you colour-correct and give your footage the 'look' you want. The captured footage will looked washed out and that's what it will look like, so don't panic!.. it's good!
When you create a project in Premiere Elements make sure you ditch the default it opens with and make a project that suits your fps and image size e.g. 25fps DSLR (just a setting name in there don't panic) 1920x1080. Also, in Elements make sure settings show 'Still Image Default Duration: 1 frame'
Article Written by Cian Houchin at Metech Multimedia